When clustering SQL on Windows Server Core, I had the need to configure the ISCSI LUNs to the server without UI. I know that there is a UI component called iscsicpl.exe that you can run and it will pop up the simple Windows UI to allow you to click through all the configuration, but I wanted to go purist on this one and learn the nuances of configuration via PowerShell the whole way through.
First you would have a SAN LUN configured for iSCSI which would have a IQN like iqn.1991-05.com.microsoft:winsan-winsql1-target. This is a unique identifier for the iSCSI resource and this is what you would connect to for the drive. To make this connection you would use the iSCSI module that has the commands you will see. Below is the example of the connection.
|
1 2 3 4 5 6 7 |
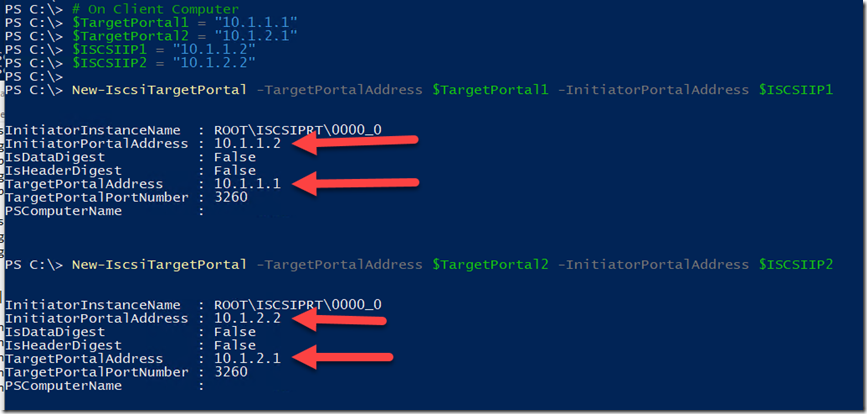
# On Client Computer $TargetPortal1 = "10.1.1.1" $TargetPortal2 = "10.1.2.1" $ISCSIIP1 = "10.1.1.2" $ISCSIIP2 = "10.1.2.2" New-IscsiTargetPortal -TargetPortalAddress $TargetPortal1 -InitiatorPortalAddress $ISCSIIP1 New-IscsiTargetPortal -TargetPortalAddress $TargetPortal2 -InitiatorPortalAddress $ISCSIIP2 |

Figure 1.1 – The same as New Discovery Portal in iscsicpl
|
1 2 3 4 5 6 7 8 9 |
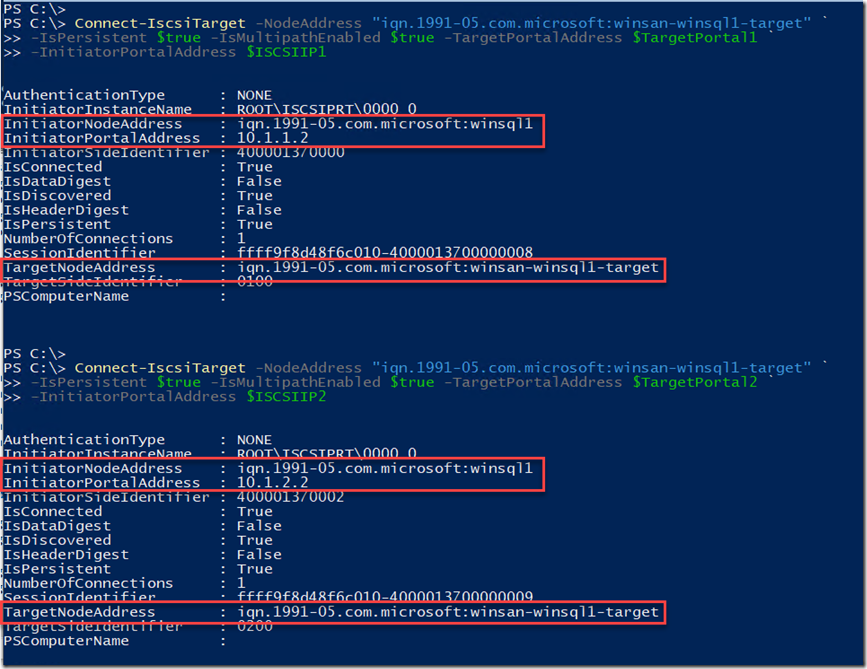
Start-Sleep -seconds 2 Connect-IscsiTarget -NodeAddress "iqn.1991-05.com.microsoft:winsan-winsql1-target" ` -IsPersistent $true -IsMultipathEnabled $true -TargetPortalAddress $TargetPortal1 ` -InitiatorPortalAddress $ISCSIIP1 Connect-IscsiTarget -NodeAddress "iqn.1991-05.com.microsoft:winsan-winsql1-target" ` -IsPersistent $true -IsMultipathEnabled $true -TargetPortalAddress $TargetPortal2 ` -InitiatorPortalAddress $ISCSIIP2 |

Figure 1.2 – Connecting with MultiPath IO using 2 different Targets and Initiators
Now you have a drive attached, at least in iSCSI. This drive will be a raw drive and using Get-Disk will show them. This cmdlet is in the Storage module in PowerShell.

Figure 1.3 – Get-Disk in action. Showing the newly attached drive
The next task is to online and configure the new drive so that you can use it. You need to initialize the disk, then create a partition of type GPT and finally format the volume with 64KB blocks for use with SQL Server.
|
1 2 3 |
Initialize-Disk -Number 1 -PartitionStyle GPT # Data New-Partition -DiskNumber 1 -UseMaximumSize -DriveLetter E |

Figure 1.4 – Initialize-Disk and New-Partition to make the drive accessible
|
1 2 3 |
Get-Volume -DriveLetter E | Format-Volume -FileSystemLabel DATA -AllocationUnitSize (64KB) -FileSystem NTFS ` -ShortFileNameSupport $false |

Figure 1.5 – Get-Volume and Format-Volume to finish setting up the drive
This concludes this part of the creation of a drive from the iSCSI side of the house. The entire piece of code is available here.
Happy PowerShelling. Onward in the quest to become a SQL PowerShell DBA.
